How do I add my email to Outlook?
This guide will aid you in setting up Microsoft Outlook. Either manually through the use of IMAP (or POP3) and SMTP, or automatically via the auto account tool.
Microsoft Outlook is one of the most popular email providers. Furthermore, if set up correctly, you can use Outlook to manage your entire mailbox. This removes the need to access webmail to use your email address.
Having your email in Outlook is great. Because you can continue to benefit from using your custom domain name email, retaining the majority of Outlook’s amazing features. Also, the added flexibility of being able to access your email from any supported device.
Add email to Outlook automatically
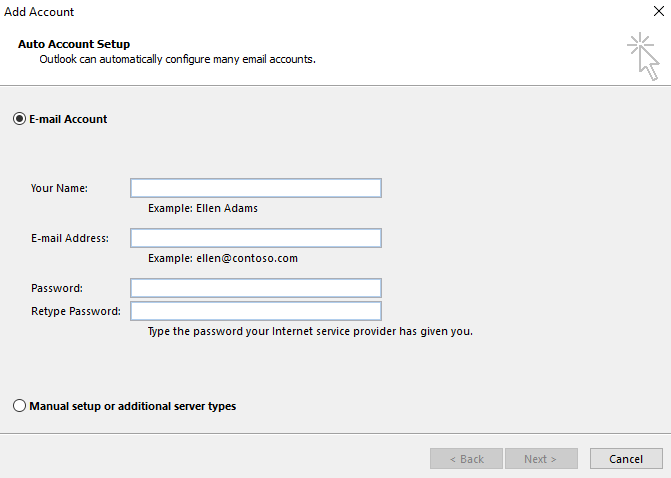
Outlook can be set up automatically, In Outlook 2016 this is how the interface looks.

- Firstly, enter your account details and click next.
- The tool will attempt to automatically set up the email. If unsuccessful, proceed to manual set up.
Add email to Outlook Manually
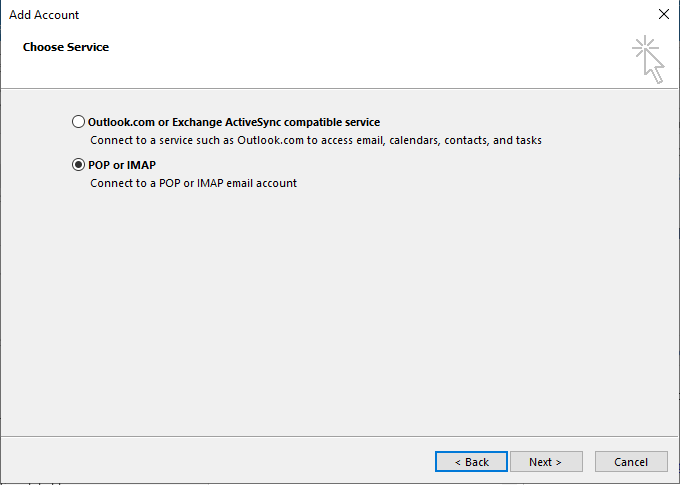
- To begin manual outlook configuration, click POP or IMAP in the following prompt.

- Once you choose POP3 or IMAP and clicked next.
Afterwards, you will see the following sections: User Information, Server Information, Logon Information. - Firstly, in the user information section, enter your name and email address.
The name setting is what will be displayed to recipients, so you can set this to what you want. - For email address enter the email address you’re adding, for example – yourname@yourdomain.uk
- After completing the user information section, select the account type, This will be either IMAP or POP3 and use the configurations settings below.
Server Information
| Account Type | IMAP/POP3 |
| Incoming mail server (NON-SSL) | yourdomain.tld |
| Incoming mail server (SSL) | cloudxx.unlimitedwebhosting.co.uk cloudxx.thundercloud.uk yourdomain.tld |
| Outgoing mail server (SMTP) | cloudxx.unlimitedwebhosting.co.uk cloudxx.thundercloud.uk yourdomain.tld |
Logon Information
| User Name: | yourname@yourdomain.tld |
| Password: | your password |
Final Checks
- Now that you have completed the configuration. You will need to check and set further advanced settings, click More Settings.
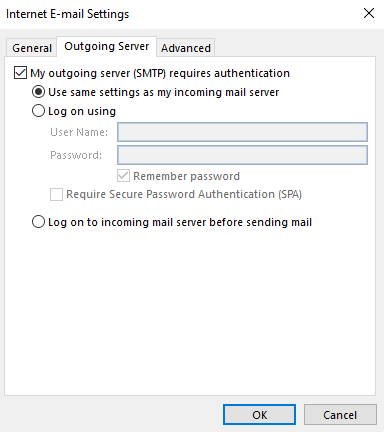
- Afterwards, click the Outgoing Server Tab and tick the checkbox for “My outgoing server (SMTP) requires authentication”
- After that, select the same settings checkbox, this saves time re-entering the same values.

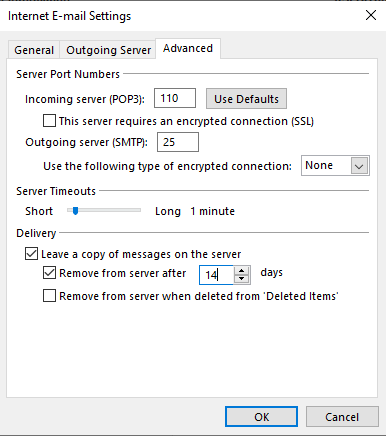
- Finally, click on Advanced, from here check the port numbers.
| Protocol | Non-SSL Port | SSL Port |
| IMAP | 143 | 993 |
| POP3 | 110 | 995 |
| SMTP | 25 | 465 |

- Once you have checked over these settings, Click OK.
- Finally, click Next, This will open the testing tool.